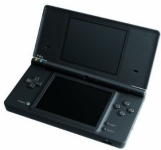
Got a Nintendo DSi and looking for help on how to connect it to the Internet? Information on how to set up the DSi for Internet access using wi-fi
Nintendo DSi ReviewOur podcast team has recorded a review of the Nintendo DSi. Listen to our Unofficial Guide online, or download it to your MP3 player. DSi Unofficial Audio Guide | What is FrequencyCast?
|
 |
 Getting the Nintendo DSi online with wifi
If you have a home Wi-fi network, then you can use this to get your DSi to make use of this to get online.
Here’s a step-by-step guide designed to help you connect your DSi to the Internet using wi-fi:
Getting details of your wireless network
Before you’ll start, you need to know some basic information about your home wireless network. Here’s some stuff you’ll need to know.
To connect your DSi using wi-fi, you’ll need to make a wireless connection to a wi-fi Broadband router , such as the BT Home Hub
The Wireless Broadband Router will have a number of settings you’ll need to be aware of. If you’re not sure, you’ll need to log on to your Router (normally using a web browser), and look through your Router’s software for the information you’ll need. If you’re not sure how to get this information from your router, refer to your router’s documentation. Here’s what you’ll need to know:
- SSID – This is a special name for your wireless network, which is transmitted by the router
- Security – Your Router should employ some kind of security, to keep hackers out. This is commonly either WEP or WPA encryption. You need to know which type of security your router uses, and the appropriate encryption ‘key’, to allow you to connect
- IP address – Your router will have a home IP address (called a Gateway address – four numbers separated by dots). The router will also be able to assign IP addresses for equipment in a given IP address range. When the Wii connects, it will need its own IP address. Most commonly, a router can automatically assign an IP address using a service called DHCP. Log on to your router, and set up LAN access (local network access) so that DHCP is enabled.
- Subnet mask: A special address that’s common across your network (should look like: 255.255.255.0)

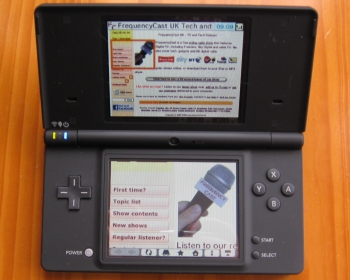
Surfing on a Nintendo DSi
Setting up the DSi for wi-fi access
Once you have the basic information about your router and network, you should be able to proceed with the following steps:
From the DSi main menu, select ‘System Settings’
- Go to the third page and select "Internet"
- Select "Communication Settings"
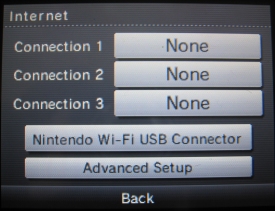
- Select a blank Connection, e.g. "Connection 1", "Connection 2" or "Connection 3"
- Select "Search for an Access Point"
- The DSi will search for all wireless access points in range, and list available SSIDs – Find your router from the list, and select it
- The DSi will perform a connection test

Can’t connect? In the event that you can’t connect to your router automatically, you can enter your settings manually. We had to do this when trying to connect to our BT Home Hub, as it seems that the DSi basic connections only support WEP wifi security, not the more secure WPA security.
To set up a more complex wi-fi connection on your DSi, here’s what you need to do:
- Follow the steps as above. Instead of selecting a connection such as "Connection 1", "Connection 2" or "Connection 3", select "Advanced Setup""
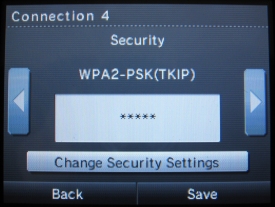
- Select "Connection 4"
- Type in the SSID (the name your router uses to identify itself), and press the right arrow
- Select the security that your router uses: None, WEP, WPA-PSK(TKIP), WPA2-PSK(TKIP), WPA-PSK(AES), WPA2-PSK(AES)

- Enter the appropriate WEP or WPA encryption key used by the router, and press the right arrow
- At the next screen, there’s the option to get an IP address automatically (using DHCP), or enter an IP manually. When done, press the right arrow.
- Next, you have the option to obtain a DNS address automatically or enter a DNS manually. When done, press the right arrow.
- On the next screen, there’s the option to enter proxy settings (advanced only). In most cases, select "No" and press the right arrow
- Finally, the option to enter an MTU value (Maximum Transmission Unit value). If in doubt, leave as the default of 1400.
- Press ‘Save’ once complete
- The DSi will perform a connection test.
That’s it
Once connected, the first thing you might want to do is update your Nintendo DSi firmware. To do this, go to System Settings, and on Page 4, select "System Update"
Problems connecting with your DSi?
Need more help? Ask in our Connectivity forum. |
Nintendo DSi F.A.Q:
Frequently asked questions on Nintendo DSi connectivity:
- Can’t enter some characters into the DSi security key box. Lee asked "I’m trying to set up my Internet, but I cannot find the £ button on the dsi when asked to type my password for my router using wpa2-psk (tkip)". Correct – it seems that the DSi on-screen keyboard can’t cope with some characters, including the British pound symbol. We’re not aware of a workaround, so the easiest option is to change your wi-fi encryption key on your router to something that doesn’t include a symbol that’s not on the DSi keyboard.
If you’ve got a question about connecting the DSi, or Internet connectivity, please feel free to ask us.
Useful links:
- BBC iPlayer – Now available on the Nintendo Wii
- DSi Review – A UK review of the Nintendo DSi from our podcasting team
- UK wi-fi information – Help on wireless connectivity
- Nintendo Wii Connectivity – How to connect a Nintendo Wii
- BT Home Hub – Help and advice on using a Home Hub

 Still having problems? You could consider using a Nintendo Wi-Fi USB Connector, which shares your PC’s Internet connection for a wireless connection to the DSi. Available cheaply from